Calendar Views
 Updated
The Shiftboard Calendar is accessible by selecting the Calendar menu at the top of the screen on any page. On the calendar, shifts are displayed in either red or green. Green shifts that have a member's name in them are the ones that a member is scheduled to work. Red shifts will indicate that they are still available. Members may be able to pick up these available shifts or express interest in working them.
Members will only see shifts that are for the Teams that they belong to in the Shift View. Many organizations use the week calendar (shown here) by default, but the calendar can be viewed in other ways. For instance, members can apply filters to view only the shifts they're interested in, or switch to other types of calendars to better fit their needs.
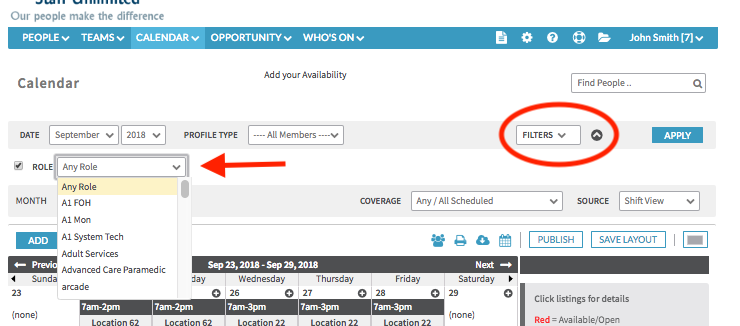
Calendar Filters
Members will only see shifts for which they are qualified in this view. But if a member is assigned to many teams, or if there are many shifts from which they can choose, then the calendar may display more information than they actually want.
Enabling Filters
Shiftboard is designed to show all of the information a member has access to and then provides filters to let them choose what they would like to see. It is possible to select which filters to enable. In this example, the Role filter has been enabled from the filters menu.
Using Filters
Pick the option(s) to filter by and click the "Apply" button on the right. The view will be updated to show only shifts that meet the search criteria selected.
The "People" button makes it possible to filter for a specific member (if permission is granted to view other people's calendar) or for a specific set of teams.
The Coverage filter displays only shifts that are covered or those that are still available.
Saving Filters
If using the same filters all of the time, use the "Save Layout" button to save all of your filters. Upon logging in next time, Shiftboard will remember the saved filters and enable them.
Removing Filters
Uncheck the box next to enabled filters to remove them one by one, or click the "Remove Filter" button to clear all of the filters.
Calendar Views
It is possible to view the calendar by month, week by time (shown above), week by staff, day, hourly by day, or in a list format. Different views display different information on the screen.
- The month view shows only high-level information, but clicking on a shift displays more information in the detail pane on the right side of the screen.
- The week views can be customized for an organization and may display additional information not shown in the example calendar above.
- The time week view shows shifts organized by earliest starting time to latest starting time, while the staff week view shows shifts arranged by person, team, role, client, or other detail that an organization feels is most appropriate.
- The day view contains more information on screen than the week view, but shows only one day at a time.
- The hour view is useful for seeing shifts displayed as bars to make it easier to visualize the day. The list view is useful for picking up many shifts all at one time and is most useful in conjunction with one or more filters.
Standard vs Widescreen
To the right of the "Save Layout" button, there is an icon for swapping between the standard and widescreen version of the calendar. In the standard view, there is a section on the right side of the calendar where details about the currently selected shift will appear. In the widescreen view, the detail section is removed to make additional space for the calendar.
Other Calendars
The "Source" button on the upper right of the calendar page enables switching to other calendars. Not all of these calendars are available in every Shiftboard site, so some of these options may not be available.
Shift View
This is the standard calendar view that is displayed above. Members need to be in this view to pick up shifts and see the most information about shifts.
Shared View
This view allows members to see who else is working. Shared view is enabled on a team-by-team basis, so a member may be able to see people working for some teams but not other teams.
Time Off View
This option is only available to organizations that have the Time Off tool enabled. This will allow members to see their own time off requests as either pending (in red) or approved (in green). Some organizations will also allow members to see time off requests from other members.
Birthdays
This option is only available in organizations that are tracking birthdays. The calendar will only display birthdays in this view, but not the birth year or age of the person.
Sign-Ups
This view is useful for quickly finding Sign-Up shifts. Like the regular view, shifts displayed in red are available for members to sign up, and shifts in green are ones that a member is already working. Shifts in dark grey are those where a member has signed up but for which they have not yet been chosen.
Staff View--Widescreen
The widescreen staff view allows managers to see what days and times members are scheduled for the week, as well as the cumulative hours assigned to them on the right of the screen. Shiftboard makes it easy to see who is approaching overtime and who has hours available. At the bottom of the screen, Managers can see how many total hours have been scheduled and how many unassigned hours remain on the calendar.
From the calendar > click Week > choose Staff View > click Widescreen View.
Trouble Viewing shifts
There are many reasons that a member may not see any shifts on the calendar. Here are the most common causes:
- Check filters--If a filter is enabled. it may prevent the ability to see available shifts. Click "Remove Filter" to clear all current filters.
- Check view--A member may be looking at a view without any shifts visible. Make sure to use Shift View when looking for shifts.
- No shifts to see--Some organizations post limited quantities of shifts that may have already been taken by other members. Check with your Manager to see if you've just missed the opportunity to pick up shifts.
- Team membership--Make sure that the member name is on at least one team. Every shift belongs to a team, and people must be a member of that team in order to see its shifts. Members may be able to join additional teams to find more opportunities.