Make Someone a Scheduler - Manager/Coordinator
Managers of a Team can fully manage a team including adding/inviting new members, changing team settings and membership levels, posting and approving new team items, assigning items to members, viewing and changing member contact information, and canceling existing items.
How to Make Someone a Manager
If the Manager is Already a Member of the Team(s)
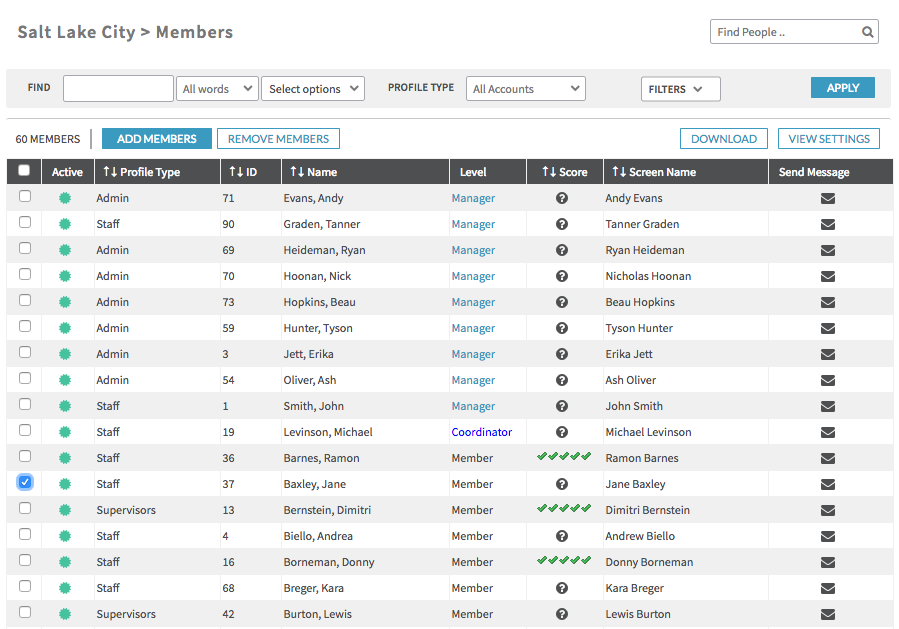
If the member to update to a Manager is already on the team, go to that team then click "Members." On the member page, find the member to make a Manager. If multiple members need to be made Managers check the box next to each member who needs to be changed to a Manager.

- Check the box next to the member name.
- Fill in the radio bubble labeled Manager at the bottom of the screen.
- Click "Set Member Levels."
If the Manager is Not Already a Member of the Team(s)
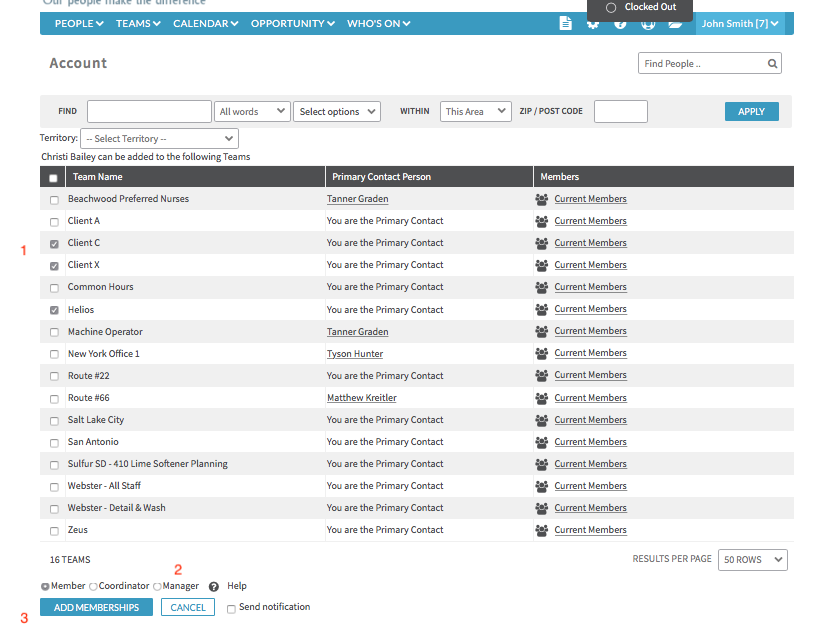
Go to the member's profile. Under the Teams tab, click the "Add Memberships" button to be directed to a list of all teams that the member doesn't yet belong to.
- Select the checkbox next to each team that the member is going to manage.
- Fill in the radio bubble labeled Manager.
- Click "Add Memberships."

It's also possible to add a Manager to a team by going to that team and clicking the "Members" button, then the "Add Members" button. This screen will show all members who do not yet belong to this team. Check the boxes next to the appropriate members, indicate a preference to make these people Managers at the bottom of the screen, then click "Set Member Levels."
Please note: Follow these same steps to make someone a Coordinator by simply selecting the Coordinator option rather than the Manager option in the last step.
Make Many People Managers of Many Teams
A Site Administrator can upload memberships and permission levels in bulk. It is generally easiest to use the options above, but this option can be useful to make many changes all at once.
To make these updates in bulk, select the Settings cog, then click the "Data Upload" button on the right side of the screen. Next, select the Team Memberships tab, which may be under the More heading. On this screen download either a blank template for completely new data or a template that has already been filled with current data to more easily make minor changes.
After making changes to the template, save it to a computer, then upload it using the Team Membership upload screen. At this point, there will be an option to either add new people to teams (at any level specify), or to make changes to existing memberships, but not both in the same sheet.
We recommend taking a look at the template with your data already in it as an example to work with while filling out the new template.

